Author: Cori Gillespie

Vintage Ribbon Christmas Tree

Since the holiday season can be hectic and distracting, I wanted to give myself the gift of time this year; time to create. When I am creating, I am able to focus my thoughts and feel peace. Besides, it’s fun!

This year I really wanted to make my own Christmas cards, but I wanted to make each one different and unique; unless I just fall in love with the design and can think of different color schemes and such to add interest. That’s the case with this cute card. I love the texture and natural colors of the ribbons! And, while it’s difficult to see, the gold star reflects the tiny gold specks in the ribbon I used for the trunk. I have some additional color ideas for this fun design that I will be testing in the next few days.

O Christmas Tree - Ribbon

Merry Christmas to all!

Delicious Fresh Homemade Salsa

This Salsa Rojo has been a staple in our family for more than thirty years and has been my most requested recipe by far. Surprisingly simple, yet super tasty and versatile for those who want to add their own “secret ingredient” (read: jalapeno for a little heat, or green onion for a fresh spring flavor). I pretty much just keep a batch of this in the fridge at all times so we can use it on scrambled eggs in the morning, chicken nachos for lunch, and fish tacos for dinner. And it’s so much better than those usually too-sweet bottle sauces you get at the grocery. Give it a try!

Cori’s Simple Salsa Rojo

1 (14.5 oz.) can petite diced tomatoes
1 (4 oz.) can diced green chiles (Hatch is best)
1 lime
1 bunch cilantro
1 tsp. salt, or to taste

Add tomatoes and green chiles to bowl of a food processor or blender. Add juice of one lime up to approximately 1 tablespoon. Rinse leaves of cilantro and roughly chop top half of bunch; add to bowl. Add 1 tsp. salt. Pulse salsa 3 – 5 times to chop cilantro and incorporate ingredients together. Taste salsa and adjust ingredients as desired.

Enjoy!

Revealing the Past

The more I work with this little table, the more deeply I fall in love with it. The details are just beautiful.

I got started with the Cistristrip by using all the precautions listed – chemical-resistant gloves, goggles, well-ventilated area, drop cloth, etc. But, I have to say, the Citristrip is absolutely a dream to work with! I could almost forget I’m working with a strong chemical! There is a light orange scent, but definitely not anything toxic smelling. I did get a bit on some clothing and on my skin. I washed both immediately and noticed no long-term effects from it. Again, I wouldn’t push it, because this is a powerful chemical, but it’s definitely a great product to work with and a huge step forward from chemical furniture strippers of the past!

20160427_002_web

I started out cautiously with a fairly thin coat and left it on the shortest amount of time – barely over 30 minutes.

20160427_005_web

I knew that this table had been painted at least twice before; the green latex that was showing and a pink latex that was peeking through here and there (and that I remembered from my youth). But even with this super cautious application of the Cistristrip, I started to see some indications of a coat of ivory below the pink.

20160427_007_web

20160427_006_web

20160427_008_web

Obviously, it was going to take more than half an hour to get through three layers of paint! I went ahead and coated this same section again and gave it a couple of hours. This time I got some serious results.

20160427_010_web

20160427_011_web

One of the truly remarkable discoveries is how well preserved these routed motifs are! The wood edges are crisp – almost as if they had been cut yesterday! And as the Cistristrip works to remove the layers of paint, it is definitely pulling up some paint that was inlaid in the motifs as well. The interior “flower” was a reddish color, but it’s hard to tell just yet what color the surrounding lines had been. I’m hoping as I continue to gently work the latex out of the grooves, I will be able to solve the mystery of what colors were in there.

I’ve already started trying to decide how in the world I can possibly do this sweet table justice in it’s new life. Somehow I want to honor it’s past and yet carry it forward. It’s a huge weight.

Turning Over a New Leaf

I have a few memories in my life that I can almost “watch” like I’m watching a favorite movie again. Do you have those? The moments are so vivid! I can remember the colors and surroundings extraordinarily well. I suppose these aren’t always ‘favorite’ moments – sometimes they aren’t the best memories. But the bulk of these vivid memories are happy ones for me.

One of these is centered around watching my Mom paint an old table she owned. I have always been a lover of history and family and, in particular, family history. So my love for this table came naturally. I remembered that the table was pink and she painted it light green. And I can remember – vividly – watching her brush flow over the table. I could tell she loved the table and that was enough to make me love the table. Once I got a bit older and could appreciate such things simply for what they are, I fell even more in love with it.

Now the table is in my possession. It has had many years of just sitting in one corner or another. I won’t say it has been neglected because each person who has had current possession of it has recognized it’s value and appreciated it. But it has just not reached it’s full potential for quite some time. I have long had the dream of removing the layers of paint to see what lays beneath and possibly unleashing some new potential for it’s future.

I’m happy to say that I finally started that project this week!

20160207_001_web

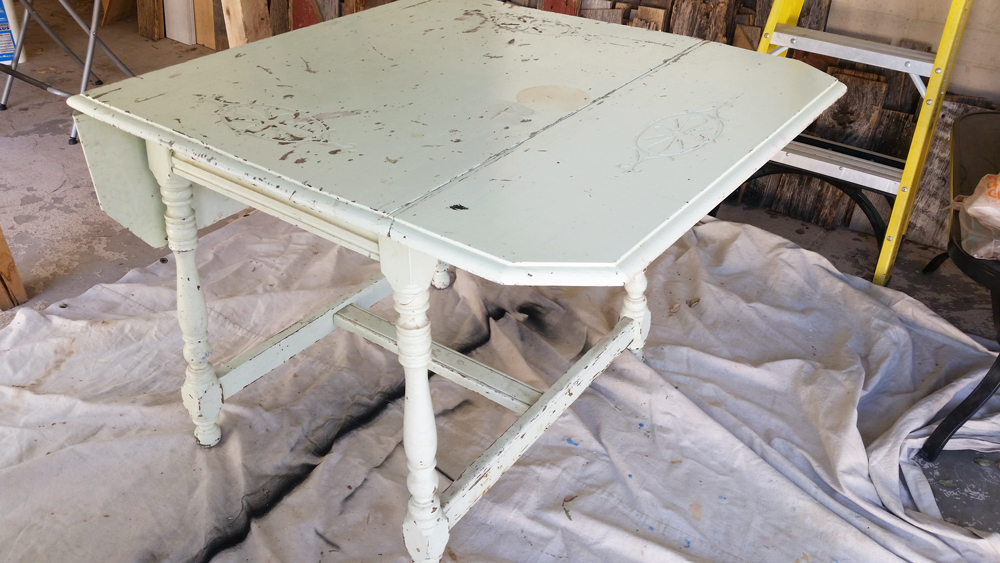
The drop-leaf table before refinishing began. It has probably been about forty years since it was painted green. Both leaves still work, but there is some wood damage at the seams. For the most part, however, dents and cracks on the surfaces are at a minimum.

20160207_006_web

20160207_004_web

20160207_003_web

20160207_010_web

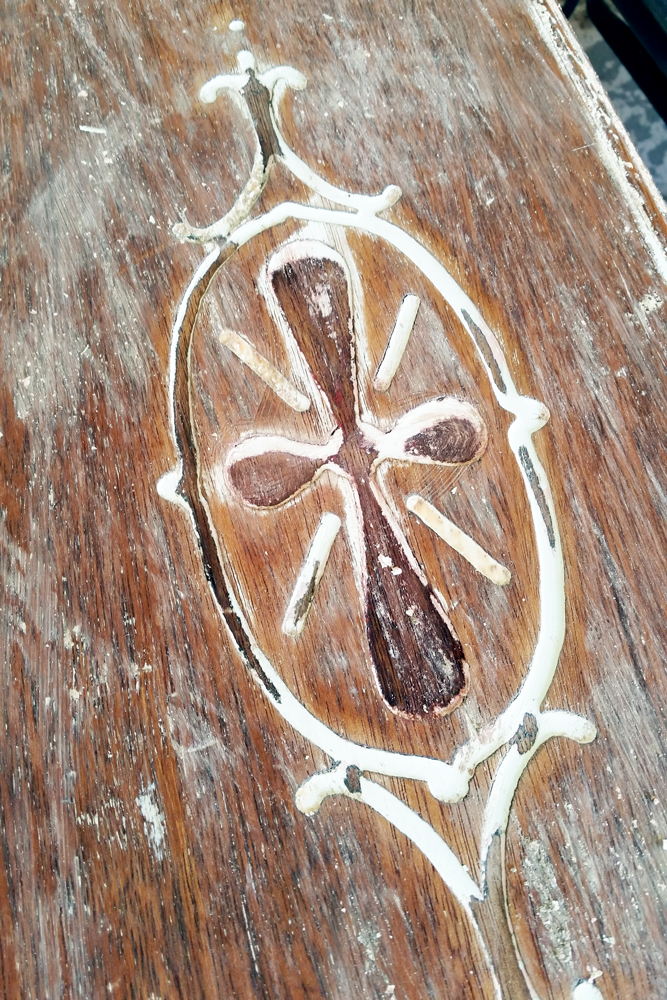
All four sides of the table top have these lovely motifs routed into them. I’m guessing they give us some idea of the age of the table – maybe 1920 – 1940? I really hope someone with way more knowledge than me about such things will be able to give me an idea. At any rate, I’m anxious to get the paint off and see what kind of shape the motifs are in. Have they been preserved by the paint? Or are they damaged under there?

20160207_013_web

I have purchased and gathered all my supplies and I am excited to get started. I specifically selected the Citristrip Stripping Gel* to try first because everything I read in my research said it was gentle even while being very effective. Even though I realize this is a piece of wood furniture, it is an old piece and I’d like to do whatever I can to protect it. I figure I’ll start with the most gentle product and work my way to more serious products only if I have to.

I do not expect this to be a quick project. This is a labor of love and I want to give this baby the care she deserves. But I will keep you posted!

*This is not a sponsored post. None of the products mentioned or pictured in this post were provided to me for free or in exchange for an endorsement. All opinions are my own.

Soul-warming Hot Cocoa Mix

Few things warm our souls when the weather gets chilly like a cup of Hot Cocoa. We’ve had a hard time finding a pre-made mix that we like; they’re often too sweet for us. We love dark chocolate and, therefore, we want our hot cocoa to have a good, rich, chocolate taste. This Hot Cocoa Mix, which is a variation of several I’ve found out there on the ‘Net, fits the bill just perfectly for us.Gourmet Cocoa

Hot Cocoa Mix

2 1/2 – 3 C. powdered sugar
1 C. cocoa (Dutch-process is great, if you have it)
2 – 1/2 C. nonfat instant milk (I only use the kind with super fine grain texture)
1 tsp. salt

Mix all ingredients together and store in an airtight container.

To make Hot Cocoa:

Add 3 heaping spoonfuls (to taste) to mug. Add hot water (or milk, if you want it super rich), stir and enjoy!

We like to add crushed peppermint, whipped cream, Andes candy bits, or marshmallow cream to our hot cocoa.

Yield: about 6 cups dry mix