Category: Kitchen

Super Easy Cinnamon Pie Crust Cookies

Family Favorite

Cinnamon Pie Crust Cookies are one of my favorite “cookies”. A simple but amazingly addictive treat, Pie Crust Cookies are a great way to use up leftover pie crust dough. The pies themselves are mostly, “meh”, for me (I know how crazy that sounds to many of you), but pie crust! Now that can be turned into something delicious. Add a cup of hot cocoa or herbal tea and I’m a happy girl!

I’ve never been a huge fan of cooked fruit pies. While there is definitely a time and place for a great apple pie, most cooked fruit makes me kind of sad. So mushy.

Dreaming of Pie

I do enjoy making pies, though. Especially holiday pies. I love most cream pies and pecan pie is one of my all time favorites. When I was a little girl, I once told my Aunt Shirley I would not go to sleep until she made me a Chocolate Cream Pie. It was already past my bedtime but she did it! Aunts are the best.

But let’s get back to pie crust and these simple delights. While store-bought pie crust makes these delicious cinnamon cookies even easier, making the dough from scratch is easy and takes these cookies to the next level. I’ve included my favorite, simple pie crust recipe here, but feel free to use your tried-and-true recipe.

Making Pie Crust Cookies Your Own

These cookies are easily modified and adapted to suit your family’s palate. Once baked and cooled a bit, I sometimes drizzle a simple vanilla glaze on top. The icing adds that extra bit of yum. It’s also fun to use cookie cutters to cut the cookies into shapes before baking. I have a friend who, instead of cinnamon, dusts hers with a bit of sugar and cocoa and some mini chocolate chips. And, if you’re into cooked fruit, you can definitely sprinkle some diced fruit on top before baking. So many fun possibilities!

Do you guys make something like this? What’s your family’s version?

Pie Crust Cookies

A simple but amazingly addictive cinnamon treat, Pie Crust Cookies are a great way to use up leftover pie crust dough.
Prep Time 15 minutes
Cook Time 10 minutes
Course Cookies & Bars
Cuisine Universal
Servings 1 crust

Ingredients
  

  • 2 Tbsp sugar
  • 1 tsp cinnamon or to taste
  • 1 C all purpose flour
  • ½ tsp salt
  • 1 tsp sugar optional
  • C shortening, butter, or lard
  • ½ Tbsp vinegar optional
  • 2 – 4 Tbsp ice water
  • ¼ C butter softened (not melted)

Instructions
 

  • Preheat oven to 400°. In a small bowl or jar with a shaker lid, mix together the 2 tablespoons sugar and cinnamon; set aside.
  • In a medium bowl, or the bowl of a food processor, combine flour, salt, and sugar, if using.
  • Cut or pulse in ⅓ cup shortening until mixture resembles coarse crumbs.
  • If using, sprinkle mixture with vinegar and mix lightly or pulse once or twice. Continue with ice water in the same manner, 1 tablespoonful at a time, until dough is just moist enough to form a ball when lightly pressed together.
  • Working the dough as little as possible, shape into a ball and flatten to ½-inch thickness, rounding and smoothing edges as you go.
  • Place dough ball between two sheets of parchment or waxed paper and roll from center out toward edges until desired thickness is reached. Remove top sheet of parchment or waxed paper and move dough with bottom sheet of parchment to a cookie sheet or baking stone.
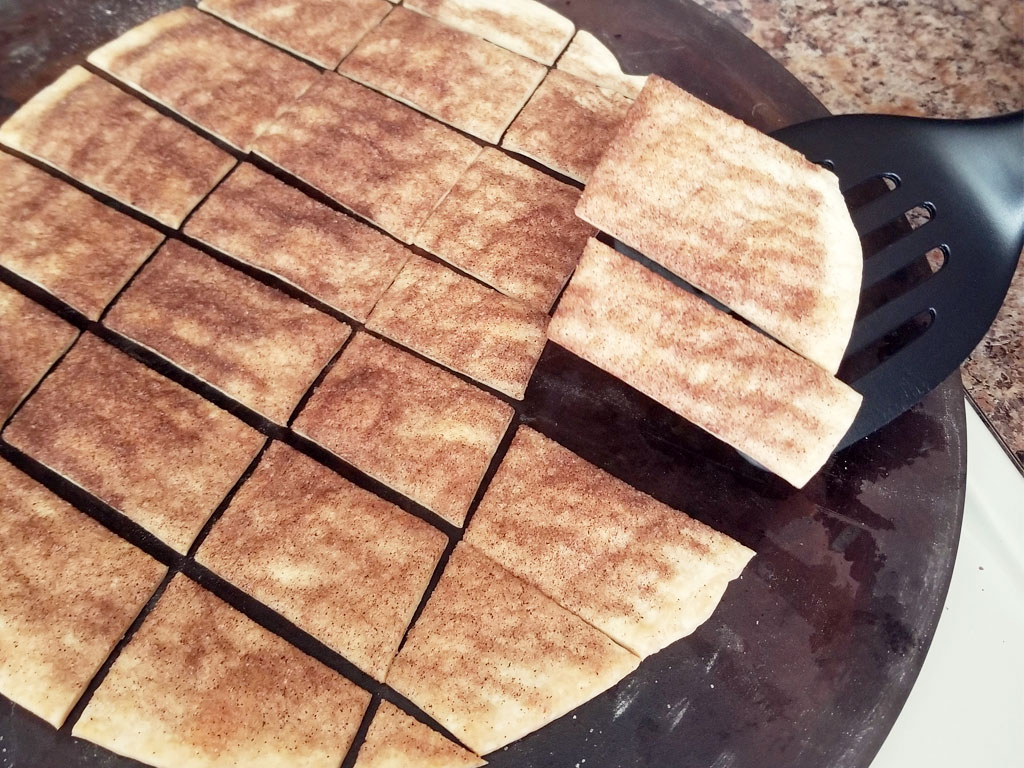
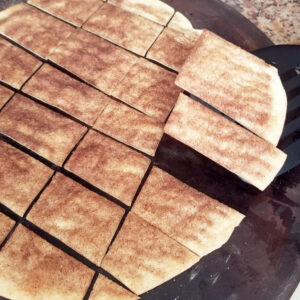
  • Using a pastry brush, spread ¼ cup softened butter over prepared pie crust. Sprinkle with cinnamon-sugar mixture. Using a pizza cutter, cut dough into roughly 2" x 3" rectangles. Separate slightly or leave cookies close together, as desired.
  • Bake at 400° for about 10 minutes or until the crust is lightly browned. Allow to cool slightly before eating, but these are delicious warm!
Keyword baked goods, cinnamon, cookies, pie, pie crust

Gramma Eddie’s Copycat See’s Fudge

My Gramma Eddie made this amazingly smooth and creamy fudge every holiday season. I remember watching her, and later, my parents, pour it onto waxed paper, form it into logs, and then stow the fudge safely in the fridge. I was so impatient for it to cool so I could get that first bite! I’m pretty sure I ended up eating most of it myself.

While I remember half of Gramma’s fudge having walnuts in it (which I hated at the time – I would literally eat around them when the “plain fudge” was gone), I only remember my parents making fudge without additions. I’ve since come to like a variety of flavors. Shockingly, I divide the candy into three portions and make some “original” or plain, some with walnuts, and some with a touch of peanut butter. I also recently started pouring the fudge into pans to make it easier on me. Plus I like the more uniform edges when it comes to cutting it. This year I cut the peanut butter fudge into squares to make it easier to tell the difference between that and the original. See recipe notes for more info on my method.

Grandma Eddie always called this “See’s Fudge Candy”. I’m not sure where she got the original recipe or if it was at all associated with See’s (probably not), but it is famous in our family and I can’t have Thanksgiving without having a bit of this fudge to open the holiday season. And it’s definitely not Christmas Day without a few pieces while opening gifts.

Five Pound Fudge Candy

A smooth, creamy old fashioned fudge recipe reminiscent of See's famous fudge.
Prep Time 10 minutes
Cook Time 30 minutes
Course Candy
Cuisine Universal

Ingredients
  

  • 4 ½ C. sugar
  • 1 12 oz. can evaporated milk
  • 1 13 oz. Hershey’s chocolate bar
  • 3 C. semi-sweet chocolate chips
  • 1 7 oz. jar marshmallow crème
  • dash salt
  • vanilla
  • Walnuts, peanut butter, etc. as desired*

Instructions
 

  • In a large, heavy pan over medium heat, mix together sugar and evaporated milk. Bring to a boil stirring frequently to keep mixture from burning.
  • After mixture comes to a boil, cook for five minutes, stirring occasionally.
  • Meanwhile, break up the chocolate bar into a large bowl and add chocolate chips.
  • Remove milk and sugar mixture from heat and add chocolate. Stir until smooth and thoroughly combined.
  • Add marshmallow, vanilla, and dash of salt; mix well to combine.*
  • Pour onto waxed paper, roll to form logs, and refrigerate until set.

Notes

  • If you want the whole batch with nuts or peanut butter, you can add them at the same time as the marshmallow crème.
  • If you’d like to get a variety from one batch, I divide the candy into thirds by using small pans. First, using a food scale, I pour about one pound of fudge into a small, well-buttered loaf pan and set aside. I then add some nuts to two small buttered loaf pans, pour about a pound of fudge into each pan, and then stir to distribute the nuts. Finally, I add some peanut butter to what remains in the pan, stir lightly to distribute, but leave ribbons of peanut butter, and pour that into a well-buttered 8 x 8 dish. 
  • Store in the fridge for maximum freshness.
Keyword candy, chocolate, heirloom

I’ve noticed it’s almost impossible to find the 13 oz. Hershey bars anymore. I usually buy two smaller 7 oz. bars and use those – all 14 oz. At lease, what doesn’t go into my mouth while I’m waiting for the boiling phase to complete. 

I’d love to hear about your family’s favorite fudge recipe. Or do you have a different favorite holiday candy? Either way, give this recipe a try and let me know what you think or if you have any questions.

Merry Christmas and enjoy!

The Best Homemade English Toffee

Heirloom Recipe

This recipe comes from my Grandma Eddie (so named because her great-granddaughter could not say “Nellie”), who got it from her neighbor, Lou. I have fond memories of Grandma’s kind older neighbor across the alley. But I have even fonder memories of my own mother making dozens of batches of this wonderful heirloom candy. It was my mom who truly perfected this recipe and has shared all the tips and tricks she uses to make it perfect. Although I suspect many of you, like me, may find that you can never make it quite like Mom’s.

One of my favorite holiday treats, English Toffee has all the best elements of a great candy. The buttery, crispy toffee is best when perfectly set to that not-too-hard, not-too-soft stage. A solid, heavy pan, and a good candy thermometer make this ideal balance fairly simple.

The next trick is getting the toffee cooled just a bit so that the melted chocolate will adhere. Too hot and the chocolate seems to melt right off. Too cool and they don’t stick together very well. Cool the candy just until it feels a bit warm to the touch. I like to also gently soak up any melted butter pooling on top. Our family likes semi-sweet chocolate, but you can definitely use any chocolate you prefer.

Once the chocolate has been spread on top of the toffee, immediately spread the chopped nuts over all and press them into the chocolate slightly. Some nuts will definitely come off once the candy is broken into pieces, but getting as many as possible to stick to the melted chocolate helps cut down on that.

I feel like candy making has become a bit of a lost art in recent years, but I’m starting to see a comeback. I’d love to know if you try this recipe!

Lou’s English Toffee

Avatar photoCori Gillespie
A wonderful heirloom recipe of a holiday favorite.
Course Candy
Cuisine English
Servings 1 Half Sheet Pan

Equipment

  • Heavy Pan
  • Candy Thermometer

Ingredients
  

  • 2 C butter no substitutes
  • 2 C sugar
  • 2 Tbsp white corn syrup
  • 6 Tbsp water
  • 1 tsp vanilla
  • ½ lb semi-sweet chocolate melted
  • 2 C walnuts or almonds chopped very fine

Instructions
 

  • Generously grease bottom and sides of a jelly-roll or half-sheet pan; set aside.
  • In a large, heavy pan, melt butter over medium-low heat. Add sugar, corn syrup, and water. Stir until sugar dissolves. Cook very slowly to 310°F on a candy thermometer, stirring occasionally.
  • When toffee reaches 310°F on the candy thermometer, add vanilla, stir well, and pour into the prepared pan. Allow toffee to cool to the touch, then gently dab the surface of the candy with a clean paper towel to remove excess butter.
  • Pour melted chocolate over candy and spread evenly over entire surface. Immediately sprinkle nuts over top and press down slightly to help nuts adhere.
  • Once chocolate has set, break toffee into large pieces. Store at room temperature in a loosely covered container.

Notes

  • Keep in mind that humidity affects candy-making. If you try making this candy on a rainy day, the toffee will not set.
Keyword candy, chocolate, heirloom, holiday, nuts

How to Make Homemade Vanilla Extract

Did you know you can make homemade vanilla extract? It’s easy, affordable, and, most importantly, delicious! Plus it’s literally a perpetual supply with just the occasional refill, depending on how often you bake. I recently saw a video by Ina Garten on making homemade vanilla extract. She showed a jar with the most beautiful brown liquid in it and claimed she has kept that bottle of vanilla going for thirty years. THIRTY years!! That’s almost as long as I’ve been married! I like things that last. Plus, has anybody else noticed that vanilla is suddenly even more outrageously priced than ever??

Disclaimer: There are several product/store mentions and suggestions with at least one direct link. None of these are sponsored and I receive no kickbacks for anything mentioned. It’s just me, sharing my opinion and research.

Justifying My Experiment

My favorite bottle of vanilla extract at Costco is currently $34.99. I don’t drink alcohol, so I had no idea how much vodka would cost, but I figured there is no way the ingredients to make vanilla extract (vanilla beans and vodka or bourbon) – and factoring in how long it lasts – can be less cost-effective than that tiny bottle.

While I didn’t spend a lot of time bargain-hunting, I did some research at Winco and Costco. However, I didn’t want to just buy the first, expensive thing either. Between Winco and Costco, I figured I would have a pretty good idea of the range of costs and quality of products at most of my local grocery resources.

Gathering Supplies and Comparing Costs

I started at Costco. They had a large bottle of vodka for $12.99. I have a 1.5-pint mason jar  (24 oz.)to put the vanilla in, so I figured with that bottle of vodka, I could make three or four jars. Cool concept if I had thought ahead about Christmas presents (it’s best to let the vanilla extract sit about six months before use), but I hadn’t. The vanilla beans at Costco are $15.99 for five beans. That’s about $3.20 per bean.

Then I headed next-door to Winco. The vanilla beans there were $9.81 for two. Yes, TWO. Which made their beans about $4.91 per bean. So, at this point, Costco definitely won the vanilla bean war.

As for the vodka, I found a smaller – but still large enough – bottle for $5.40. My research showed that as long as it’s at least 80 proof, any vodka will do.

Pricing Vodka

I bought the vodka at Winco and then headed back over to Costco for two vials of vanilla beans – plus a couple of other things; it IS Costco, people! Besides I had walked back and forth between the two stores and needed snacks.

I happened to have a vial of vanilla beans I had purchased at Winco a couple of months ago for some homemade vanilla bean ice cream that never happened, so once I got home I did a quick comparison of beans:

Vanilla Bean Comparison

Ummmm…. Wha….??? The straight across cost comparison between Winco and Costco just got a whole lot more complicated. Or simpler, depending on your point of view. For me, once I saw the difference in quality, The Costco won again. Praise to The Costco…

Technically the “recipe” calls for between 12 and 24 vanilla beans per jar of extract. I had three beans at home already (the Winco vials use to have three, but currently only have two), so I purchased two vials from Costco. That gave me a total of 13 beans. I plan to add a few more in a couple of weeks – after my budget recovers from the initial set up.

Keeping it Simple

The actual process for making the extract is ridiculously simple. First, add 12 – 24 beans to a clean jar…

Make sure the jar is tall enough to handle the beans without bending or breaking. Also be sure there’s enough room between the lid and the beans so that the beans can be completely covered in the vodka.

Then, add enough vodka to cover the vanilla beans. Cover tightly, label and store.

That’s it!

Final Analysis

If I factor in the cost of the jar, it cost just over $40 to get my vanilla extract going.  I have a bit of vodka left over to top off the jar as I use it. That gives me 24 oz. of vanilla extract for $40; about $1.67 per ounce. My favorite extract at Costco currently costs $34.99 and has 16 oz. in it; about $2.19. I’ve already saved some money! And everything I’ve read said the flavor is incredible. I’ll keep you posted on that. Better yet, try it yourself and let me know how it goes.

While you technically can use homemade vanilla extract after aging for as little as one month, every source I read said to wait at least six months for full flavor. After that, you can not only use the extract itself, but can snip off the end of the beans and squeeze out the seeds. I’m super excited for that first batch of Homemade Vanilla Bean Ice Cream this summer!

Delicious Fresh Homemade Salsa

This Salsa Rojo has been a staple in our family for more than thirty years and has been my most requested recipe by far. Surprisingly simple, yet super tasty and versatile for those who want to add their own “secret ingredient” (read: jalapeno for a little heat, or green onion for a fresh spring flavor). I pretty much just keep a batch of this in the fridge at all times so we can use it on scrambled eggs in the morning, chicken nachos for lunch, and fish tacos for dinner. And it’s so much better than those usually too-sweet bottle sauces you get at the grocery. Give it a try!

Cori’s Simple Salsa Rojo

1 (14.5 oz.) can petite diced tomatoes
1 (4 oz.) can diced green chiles (Hatch is best)
1 lime
1 bunch cilantro
1 tsp. salt, or to taste

Add tomatoes and green chiles to bowl of a food processor or blender. Add juice of one lime up to approximately 1 tablespoon. Rinse leaves of cilantro and roughly chop top half of bunch; add to bowl. Add 1 tsp. salt. Pulse salsa 3 – 5 times to chop cilantro and incorporate ingredients together. Taste salsa and adjust ingredients as desired.

Enjoy!